How to Shoot Straight Down
I’m sure you’ve seen those straight down beauty shots of food prep and craft work and probably thought I’d like to do that but all you have is a tripod. No problem. One way I’ve seen it done is to point the camera straight down at the floor and throw down some cutting boards or a fake tabletop. Simple solution but the problem with this is you have to get down on the floor to work in the shot. That blows.
You could use your tripod on top of the table, lengthen the back leg and tie it off, to get the camera a little further out. But the problem with this is your tripod and your camera are now attached to the table you’re working on. Shake the table and you shake the camera.
I'm going show you a few tricks from the grip world as alternatives to using a tripod that I think you’ll like.
1/4"-20 thread receiver, a standard for most video and still cameras.
The 1/4"-20 Standard
With a DSLR or camcorder we know we're working with a standard which is the receiving end of a tripod screw. 1/4”-20, 1/4” diameter screw with a 20 thread count. Let's use this standard to our advantage.
I use a 4" long 1/4"-20 bolt to rig video cameras to a grip stand.
This bolt size is a standard size available at any hardware store. Here I have a long 1/4” bolt that’s threaded only on the end and a nut to go with it. I’ll attach the bolt to the camera, careful not to force it in too far which could damage the camera body, and tighten the nut to hold it in place. Careful not to over tighten as well.
I use a wooden shim to help offset the thickness of the bolt in the grip head.
Now I’ll rig the arm out and grab the non-threaded section of the bolt in the grip head. You may want to use a shim or wedge to offset the thickness of the bolt. I use a bubble level to check if I’m level then adjust by eye later.
Using a Tripod Ball-head for Flexibility
If you need more flexibility you can do the same thing with a tripod head. Here I have one from a table top skateboard rig that also takes the same 1/4” bolt size. By using the tripod mount I have a bit more flexibility in how I position the camera.
Instead of attaching the camera directly to the bolt, it can be helpful to use a ball-head mount instead, for more flexibility and the ease of having a quick release.
Note you may need to sandbag the hell out of the grip stand not only to protect you camera from tipping over but also to reduce any camera shake.
But what if you want a little more room to work in the shot and the grip stands in the way? You could work on the other side and flip your image in post. That’s fine but the issue for me is I would be standing in my light.
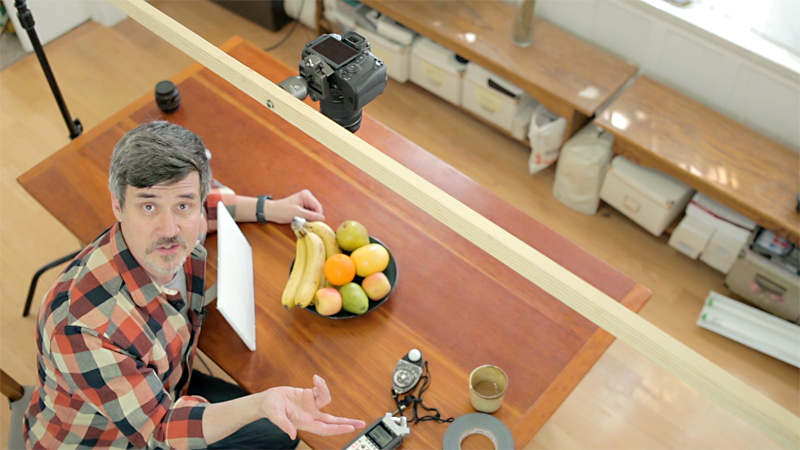
Goalpost rig with an eight foot 1"x2" piece of baton and two grip stands.
The Goalpost Rig
I’ll build what we call a “goalpost” using two grip stands and a piece of 1” x 2” baton across the table. It gives you more room to work and less chance of introducing camera shake.
The bolt in a grip head is a standard 3/8" diameter. Drilling 3/8" holes into your baton allows you to rig it between two grip stands, making a goalpost.
I’ll rig it lengthwise across the table with an 8 feet long piece of baton. I’ll drill a hole in both ends with a 3/8” spade bit to slip it onto the grip head bolt, and lock it in place.Then I'll drill a 1/4” hole wherever I need to position my camera. The true thickness of a 1” x 2” baton is actually 3/4” (1” is the original thickness of the rough wood, before they plane it down) so I’ll use a 1/4” bolt 1” long. Now I can either go right into the camera or for more control into that tripod.
I'm using Minis c-stands for this demo but you can use standard height C stands to get a lot more height if needed.
Example of the goalpost rig for an overhead shot. I'm using two mini grip stands here but you can use standard height stands to get more height.
Note that the main disadvantage with this rig is getting to the camera in order to turn it on and make any adjustments to ISO, focus etc. A trade off for that height.
Note that some larger cameras and tripod heads take the larger standard bold size 3/8”-16. Our tripod head actually can take both due to an insert adapter.
Music & Audio
Life Is Sweet
Silent Partner
https://www.youtube.com/audiolibrary/music
The Big Score (Music bed)
https://www.youtube.com/audiolibrary/music
deathFalling [THM_Adventure]
By alex_audio
falling into death and getting faded away [my own voice]
https://www.freesound.org/people/alex_audio/sounds/188565/
Melee Weapon hit with male moan & body fall
By Paul368
Sound I created for a film I did the effects for though I'd share it with you guys. Its a sound Designed for someone to get hit with a Melee weapon. Created using punch sounds I've made with also a body fall.
https://www.freesound.org/people/Paul368/sounds/264062/
Amazon Affiliate Links
Tripod Ball Head with Quick Release Plate By Fancierstudio
https://alexa.design/2nyeOuc


