
For many people, their first time on a film set can be pretty exciting and overwhelming. A lot is going on. Set walls being placed, lights set up, camera, dolly, hair and make-up, and a piece of singular bizarre equipment being used that you probably never seen anywhere else-the c-stand.
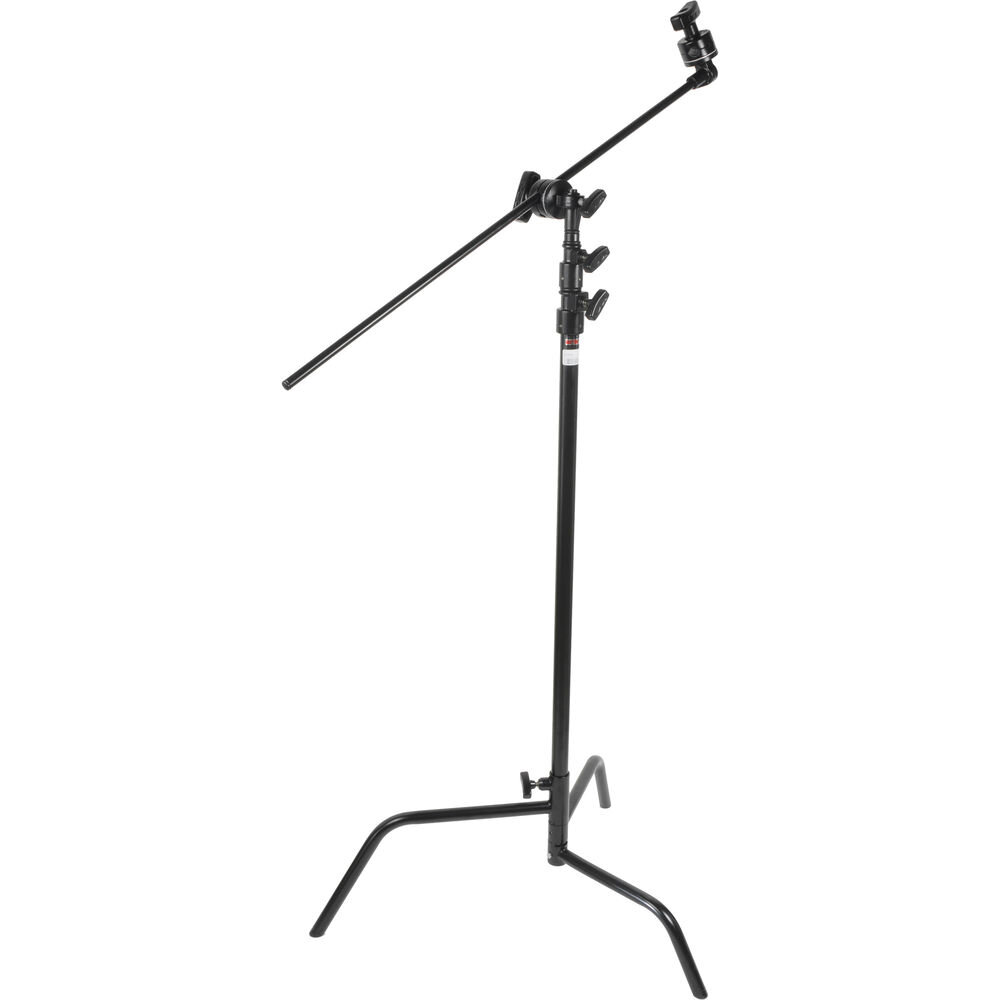
The C Stand: Legs, Riser, Grip Head and Arm.
This thing has three odd legs, each one a different size. It has a riser like a light stand but this giant metal holed disc on it that reminds me of those wooden spools from a Tinkertoy set, except with different shaped holes and a locking knob. And in it is a pole with the same type of head on it. What is this thing for?
Oh, it’s for everything. This is the c stand, short for century stand, also known as the grip stand. It’s been in the film biz for a very long time and its true originals are bit clouded. This is because back in the day, each studio made their equipment. It wasn’t until the early ’70s when Matthews’ started producing standard gear which they sold and rented to the studios. But what we care about right now is how to best use one and why I think every home should have at least one.
Purpose of the C Stand
The purpose of a grip stand is to allow you to place, hang, or hold an object somewhere in the space you’re working in.
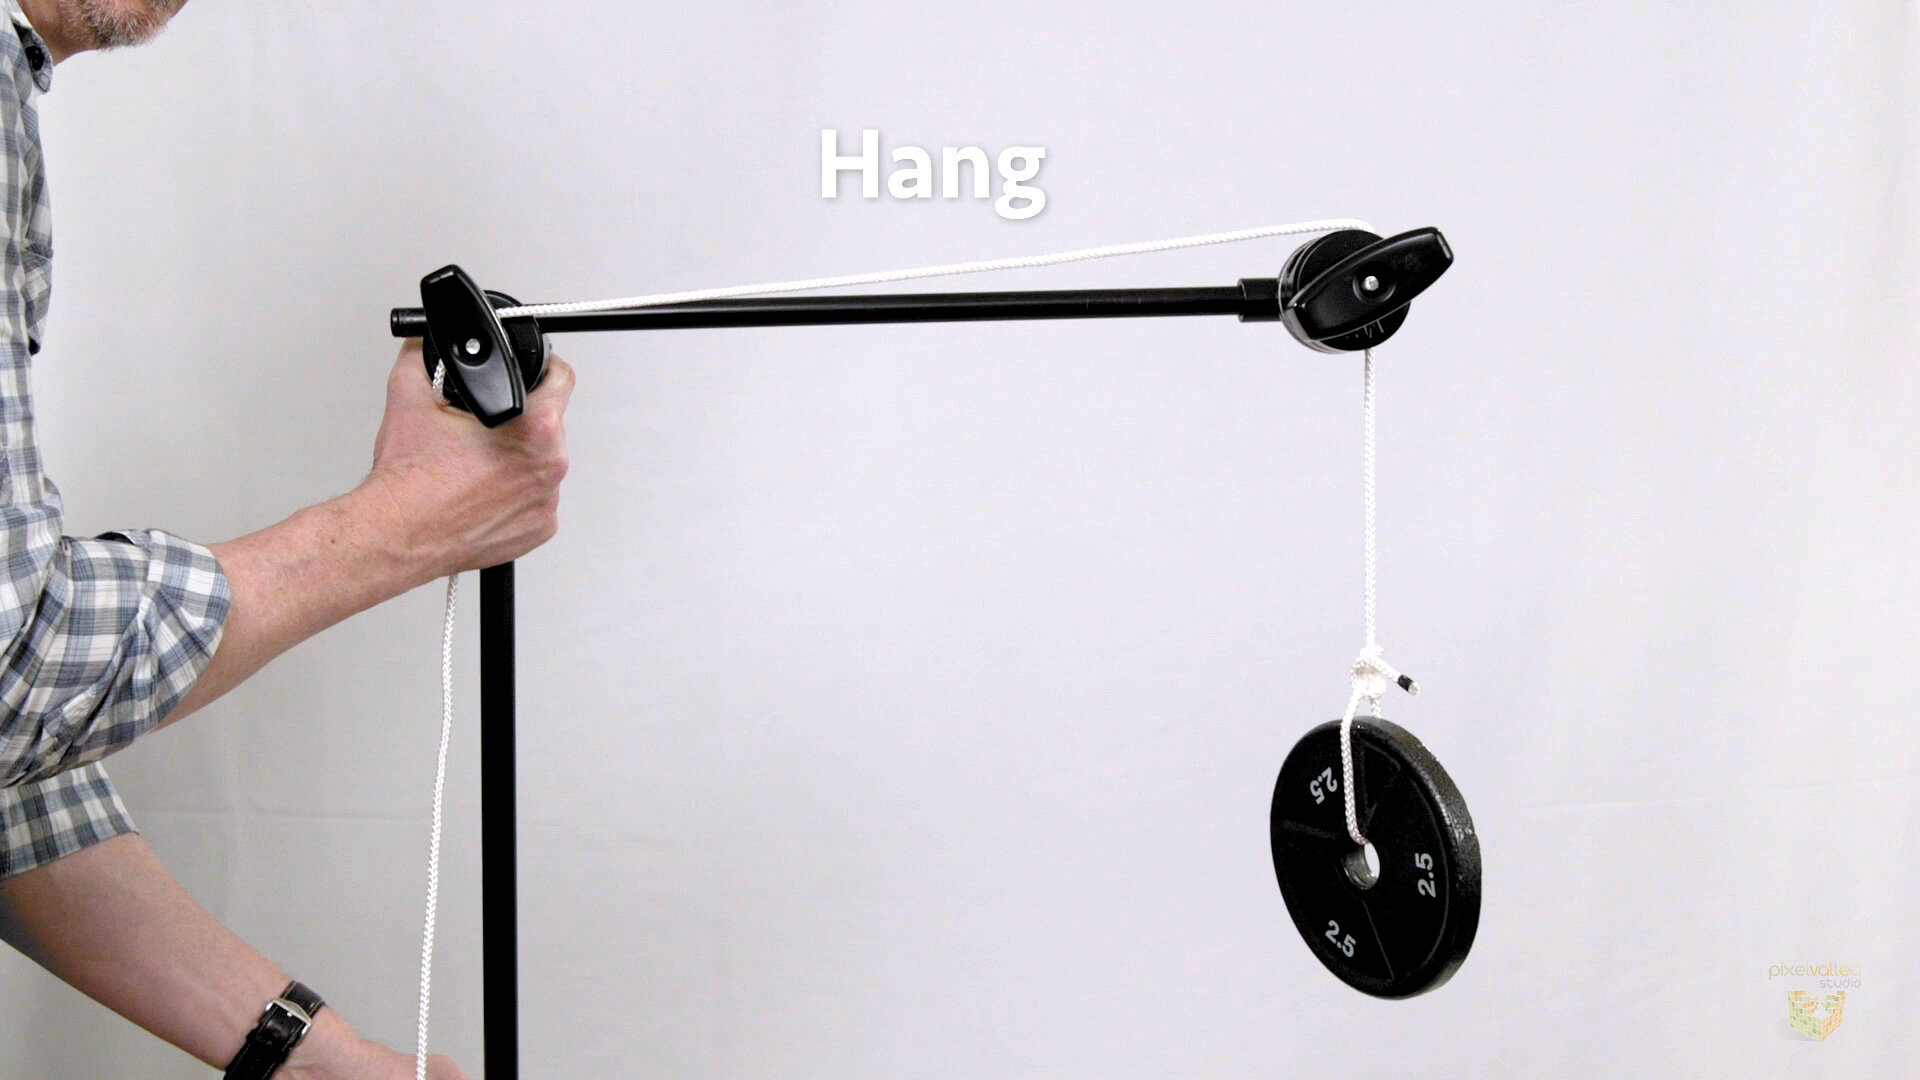
Hang

Hold

Place
The grip arm can extend from the grip head, which can spin it 360°. The riser on the grip stand extends this sphere up into a cylinder. This means we can place, hang, or hold an object anywhere within that space.


So that means if we need to place a flag, or hang or hold an object in the frame, a grip stand makes that possible. And that is the purpose and beauty of it.
If you’ve ever worked on a project at home and had to lean a board on a chair or try to tape something to a table with a broomstick to get it where you want, that’s the grip stands job. What it was designed to do and do very well. It’s a shame it’s only used in the film, video, and photography biz.
C Stand Breakdown
A grip stand is comprised of three sections, the stand, the grip head, and the grip arm.
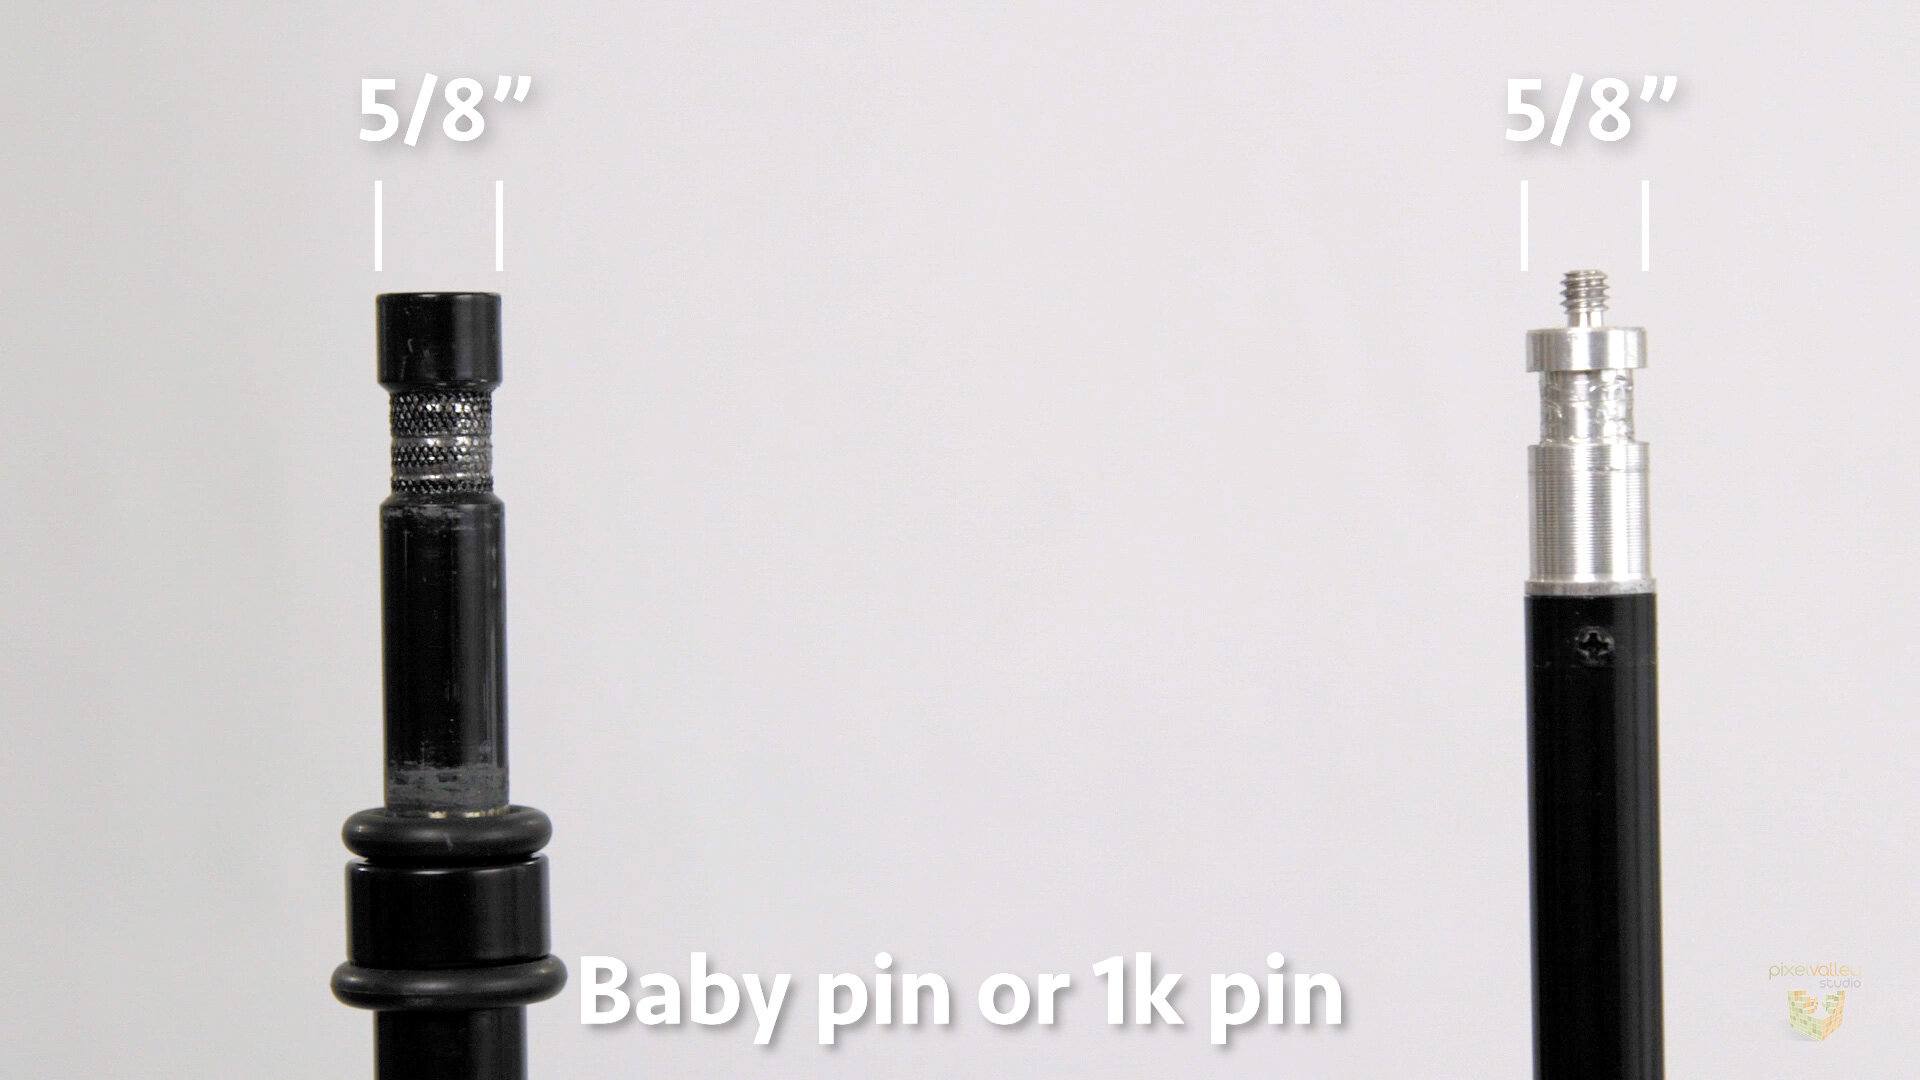
The stand has a standard 5/8” inch pin sometimes call a baby pin or one K pin. This is referring to what are the smaller standard industry lights that mount on this pin on a regular light stand.
This means, yes you can use a grip stand as a light stand in a pinch.
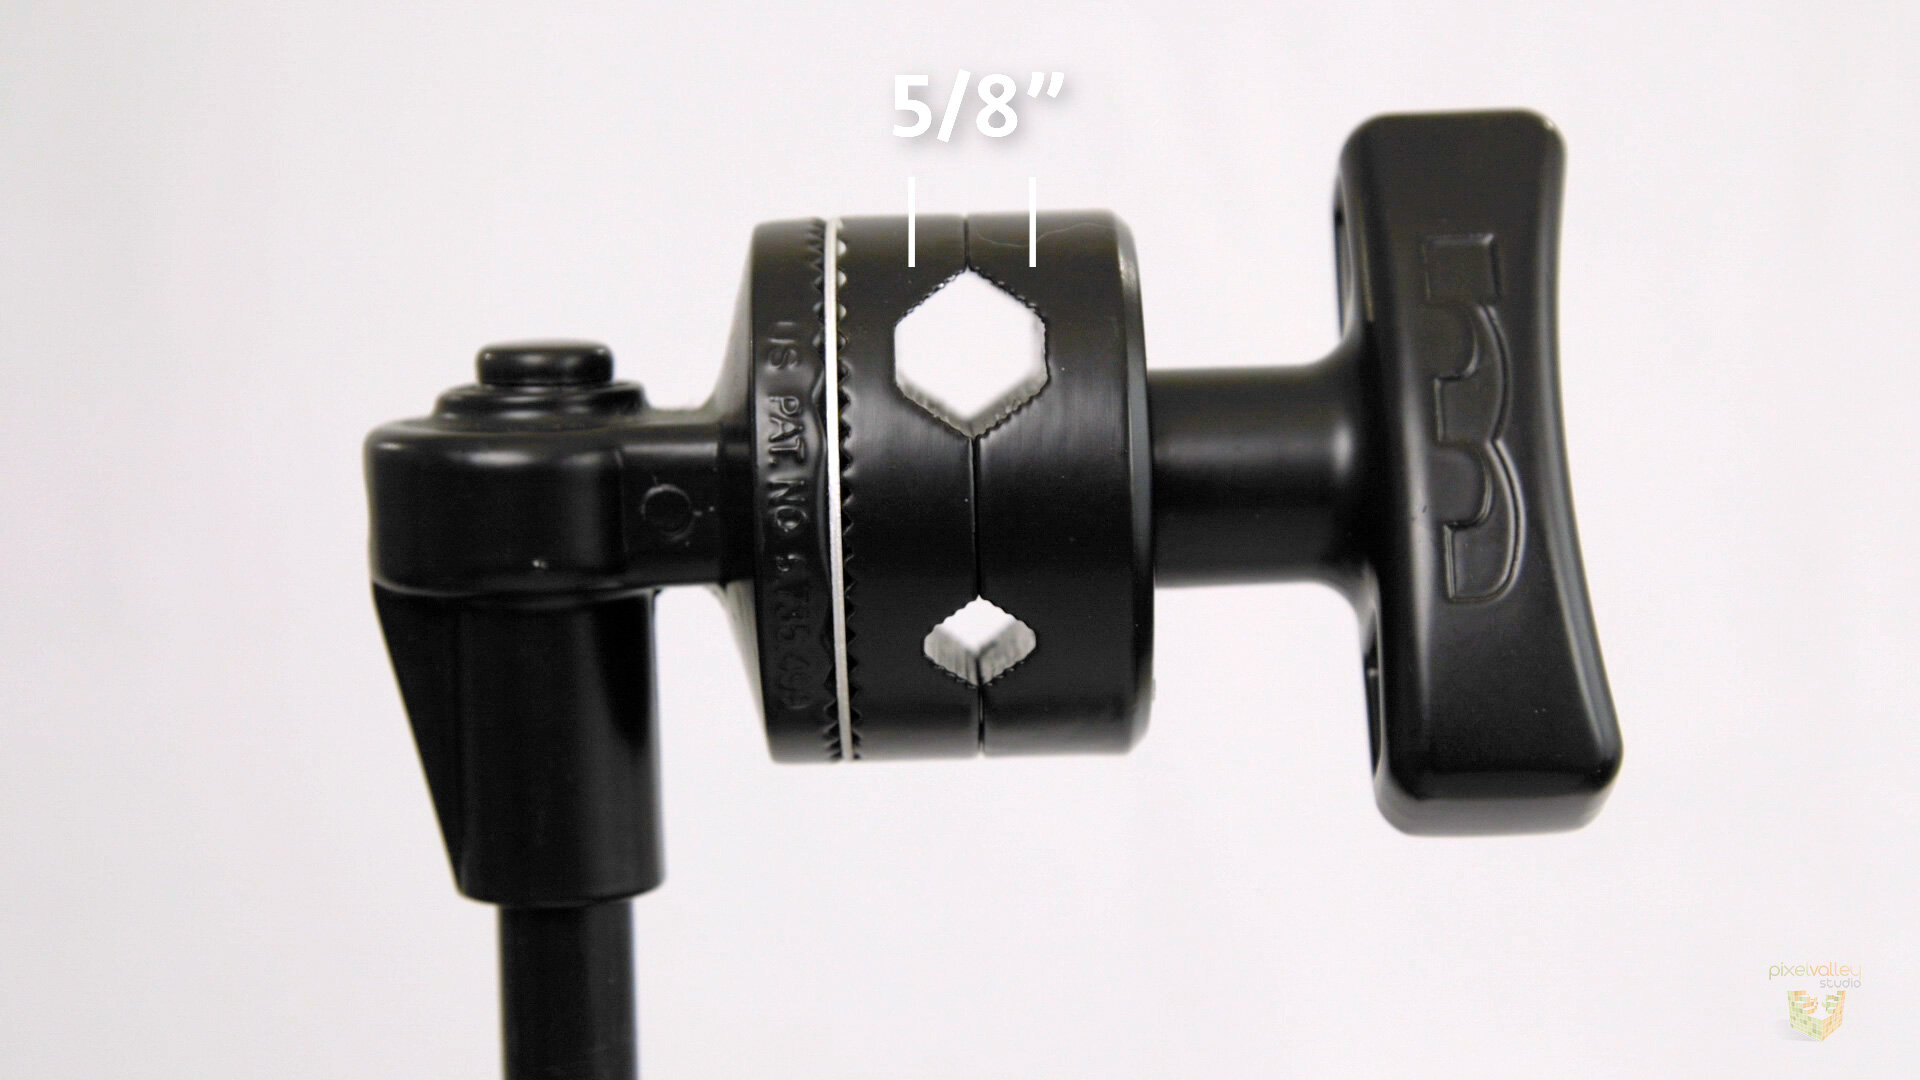
The grip head has a series of holes in it, the larger is a 5/8” receiver.

A grip arm happens to be 5/8” in diameter the same as the 5/8” stud. This means a grip head can also receive another 5/8” stud like this one on a pigeon plate. Normally you would attach a pigeon plate to a wall or a pancake to place a light on that stud but here we're reversing that.
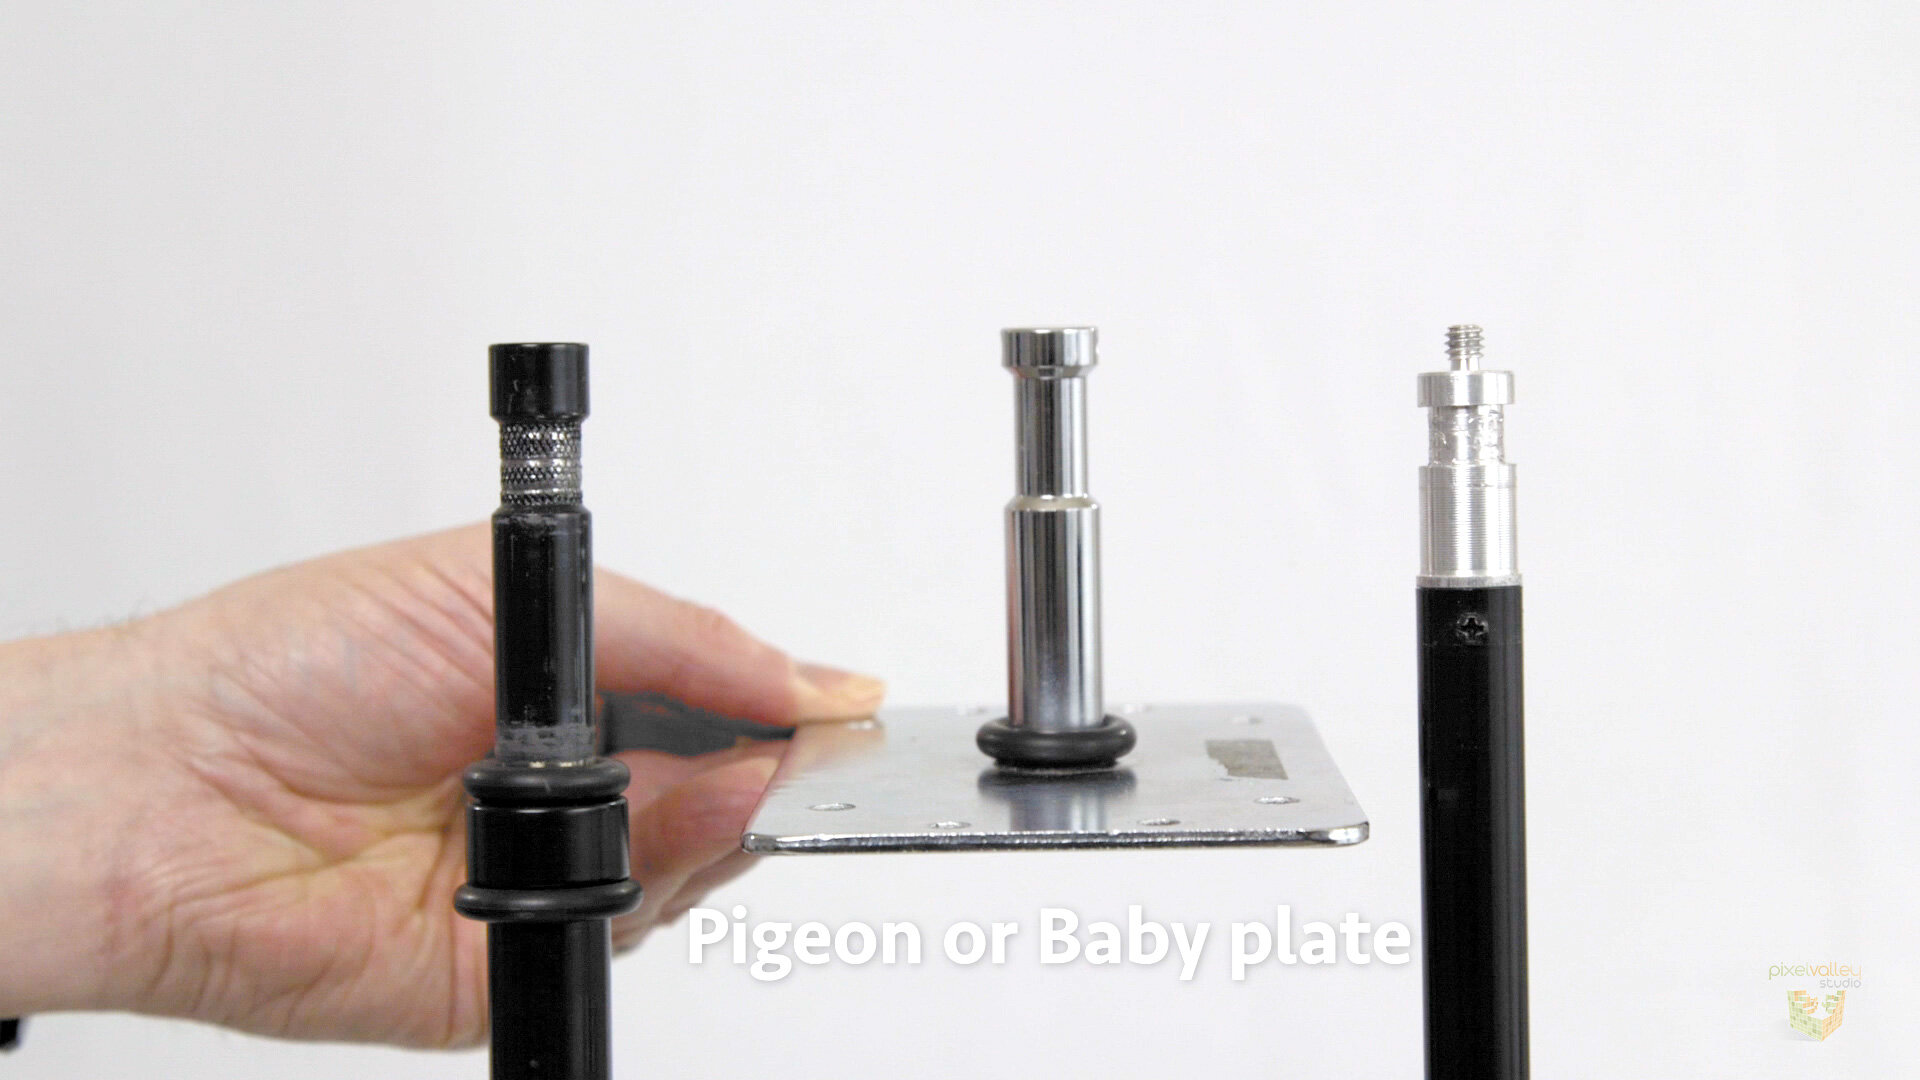
I turned the pigeon plate upside down and mount it inside the 5/8” receiver of the grip head. We now have a plate that can be used horizontally to hold objects in the shot. Or vertically to attach an object to it that we want to be held in the shot.

The grip arm is just a grip head, with a 5/8” diameter tube attached to it. This means, yes we can place lights that we normally would put on a 5/8” stud onto the end of the grip arm.

We can even buy a 5/8” piece of aluminum pipe from a hardware store and put that in the grip head and hang a light from that. Heck, we can even put another grip arm into the grip arm head giving us an additional joint to manipulate. This is helpful when the grip arm is holding something that you need to spin on its axis.

The other hole in a grip head is also a standard in the industry and it’s used to hold the ends of flags, nets, and open frames.
And the really small hole, usually a diamond shape, is for holding smaller items like dots and fingers, which are just miniature flags and nets, and also wire and rope.
Now because the grip head is a big set of washers, you can also just place thin objects into it like a sheet of showcard to use as a reflected fill light.

If you want the card coved, so the bounce is more directional, piece of g or paper tape.
C Stand Legs
Why are the grip legs different sizes? So they can fold up flat into a nested position, then easily stored away and stacked in bins.
This means we do need to open them up when in use and close them to stow them away.
Opening them is easy but first, never turn a grip stand upside down to do this. If one of the risers of the grip stand was lose it could slide and break something onset or hurt somebody. Yes, you can check each one to make sure it's tight but you're wasting time especially if you have dozens and dozens of stands that you're using onset. Just spinning it upside can be dangerous especially on a tight set. Don't turn them upside down ever. You don't need to here's why.
Because it’s really easy to open them. Put the big leg between your legs and pull the small leg open till it locks, about a one-third turn. Then open the medium leg one third. It will move the small leg with it. It’s now open. Two easy motions. It’s that simple.

Lean big leg against inside of your leg.
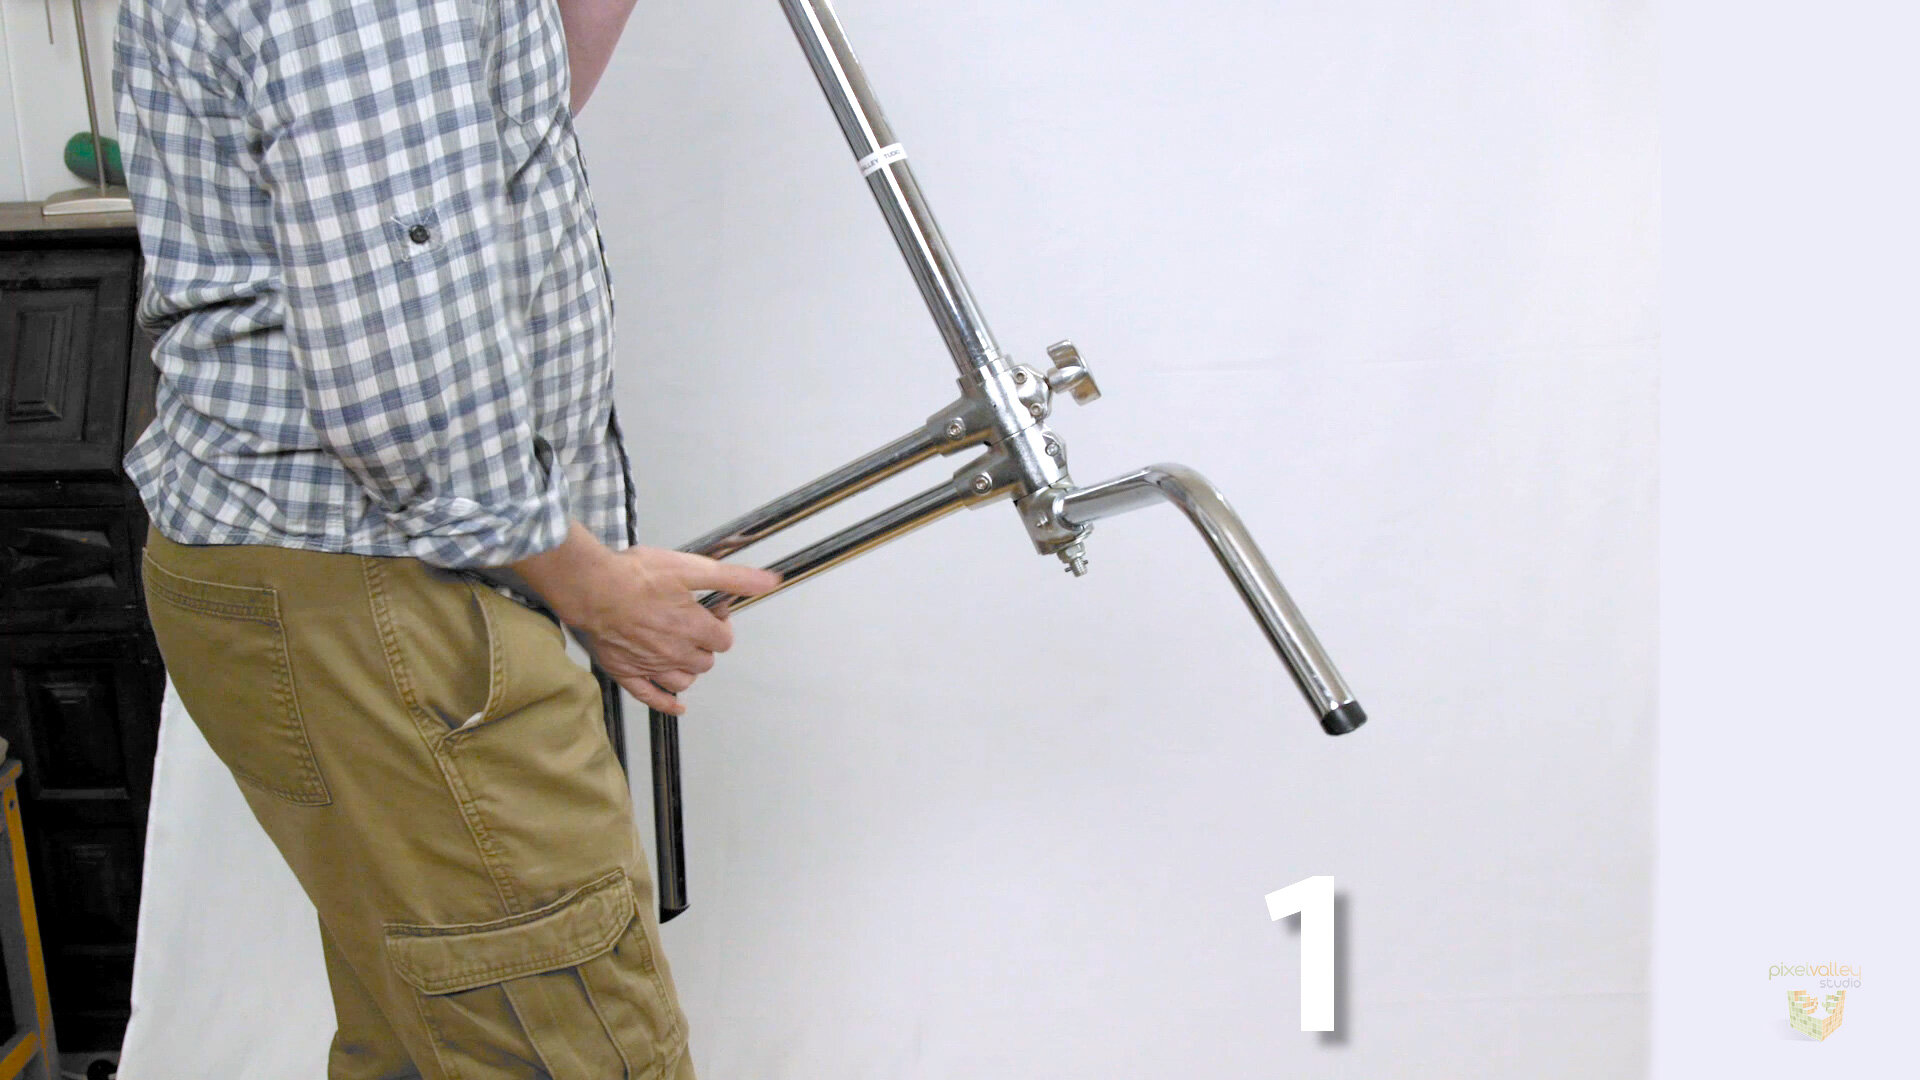
Pull the small leg open till it locks, about a one-third turn.

Then open the medium leg one third. It will move the small leg with it.
And the same to close just in reverse. Put the big leg between your legs, close the middle leg, then the small leg. Into the bin or grip cart. That simple. It’s a beautiful thing.
Note when you open them, they’re also easy to stack together in a nice row.
Because we have three different size legs, it only makes sense to put the weight of whatever you’re hanging over the big leg. It’s sturdier. So no matter the size or weight of the object the arm is holding, make a practice of always putting the big leg under the arm.

Note, there will be times when you just can’t do it. Something like a wall or furniture will block the big leg. It’s okay. Just sandbag the hell out of it.
Righty-Tighty, Lefty Loosey
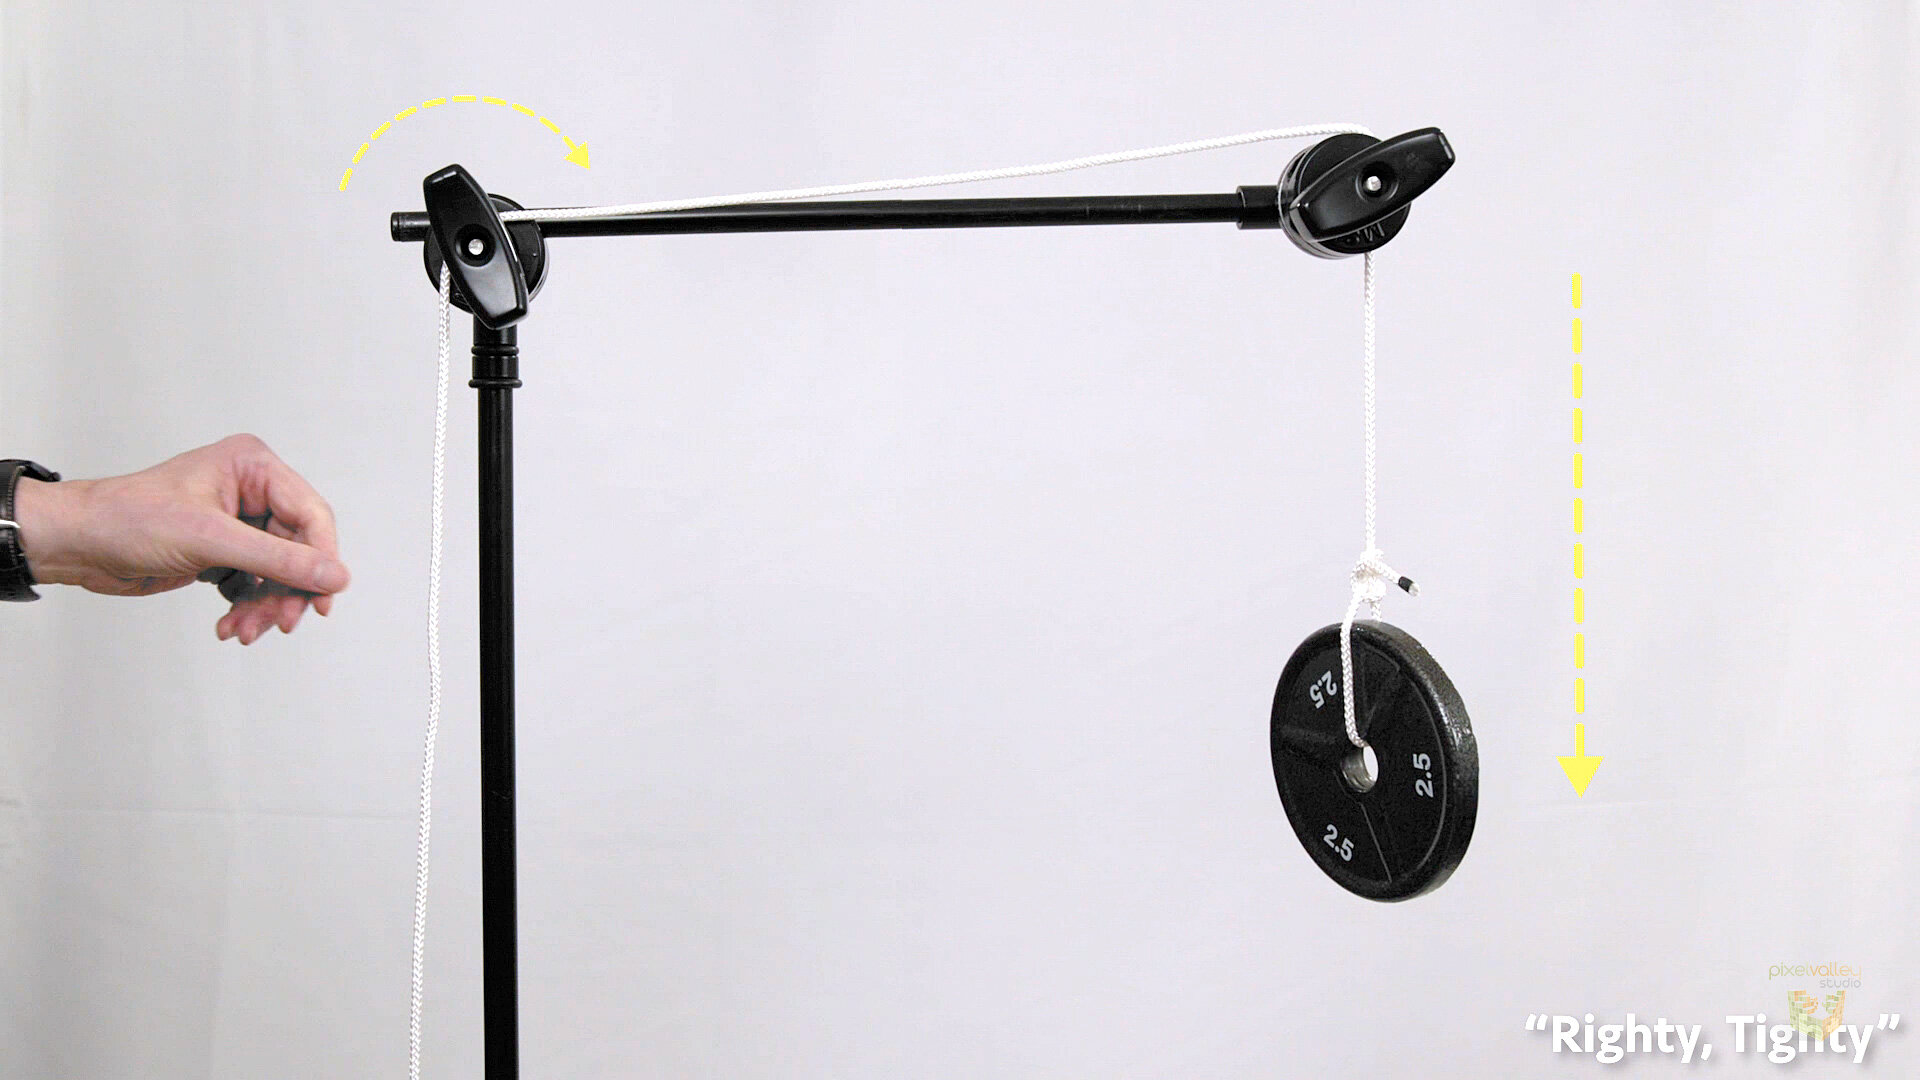
Now there’s another important point about the grip head. It’s just two big washers with holes in them, hanging on a bolt with a knob as the nut to tighten them together.

This means righty-tighty comes into play. If you’re hanging an object on the grip arm on the right side when facing the grip head knob, that’s the right side. Any weight you put on that arm will tighten the head. Righty-tighty.
If it’s on the left, it could loosen it. Lefty-loosy.

Regardless of how light the item may be on your grip arm, get into the practice of always using the arm on the right side, the righty-tighty side, of the grip head.
Some people may think this is silly but here’s the thing. When you’re working 12 hours, sometimes more, you’re tired, maybe you’re not feeling well, it’s not the time to think. It’s time to act in a rote way, based on practice and muscle memory. Trust me, you don’t need to be thinking just acting at this point. Righty-tighty.
Grip Arm Danger Zone
One more safety tip. Because a grip arm can spin in a vertical arc, it does mean the end of the arm could be placed into this unsafe zone between the crotch, chest, and head. Though sets may be brightly lit, behind the equipment doing all the lighting, where the stands are placed, can be pretty dark.

So you need to avoid putting the grip arm into this position.
How? Adjust the riser to change the angle of the arm. The grip arm head is still in the same spot but note the grip arm is no longer in this danger zone. It could also require you use a different size stand.
Types of C Stands
There are a few different types of c stands

The standard grip stand is labeled as 40” and has two risers, a grip head, and a long grip arm, as well as the standard, spring-loaded nested legs

The next size down is called the baby c-stand, labeled 20” and has a few nicknames that vary by where you’re at. Those are the two main sizes.
Now there are a couple of varieties on the nested legs
One is the rocky mountain leg. It allows you to adjust the hight of big leg position to fit on raises surfaces like stairs, or a slight grade in a road or hill.

The other is called the Turtle base. Here the riser separates from the legs to reveal another standard, the 1 1/8” pin receiver.
This receiver matches the other type of light stands, which hold larger lights. Sometimes called a 2k or Junior receiver.
The turtle base allows you to set a light very low to the ground.

Those are the basics around using a c-stand. A super amazing tool that can be used for other projects you may have in the home.
In the next month or so, I’m going to show you how to use flags, nets and open frames with c-stands. That video will also be made possible by our awesome sponsor Bolt Lighting Rental.
Our Sponsor
Bolt Lighting Rental is a full-service lighting and grip rental house located in the San Francisco Bay Area.
https://www.boltlightingrental.com/
Pixel Valley Studio Courses
Discover why and learn step by step how to master audio in your edit like a pro with our first 3-hour course. On sale now for $50.
Learn More Now
🎧 Mastering Audio for Premiere Pro CC https://pixelvalleystudio.thinkific.com/courses/mastering-audio-for-premiere-pro-cc
Equipment Used
Note: As an Amazon Associate we earn from qualifying purchases from Amazon.
Avenger 40” C Stand Standard https://amzn.to/2GgyGsJ
Avenger C-Stand 40” Turtle Base https://amzn.to/2ReNAq4
Pigeon Baby Plate https://amzn.to/2RePOWs
⅝” OD Aluminum Pipe https://amzn.to/2TM5H8i
Americain Grip https://americangrip.com/product-category/stands/century-stands/
Matthews Studio Equipment https://www.msegrip.com/collections/c-stands
Film Tools https://www.filmtools.com/grip-and-electrical/stands-booms-jibs/stands.html
B&H https://www.bhphotovideo.com/c/buy/Lightstands/ci/5799/N/3660843711
Links:
💰 Consider supporting us on Patreon https://www.patreon.com/pullmyfocus
🛒 Our Amazon Affiliate Store https://www.amazon.com/shop/pullmyfocus
As an Amazon Associate we earn from qualifying purchases.
🎹 Music
“Right Place, Right Time” by Silent Partner from YouTube Audio Library
Other music from Epidemic Sound https://www.epidemicsound.com
Stills
By Vancouver Film School - Flickr: VFS Summer Intensive Programs 2011, CC BY 2.0, https://commons.wikimedia.org/w/index.php?curid=20424330
Dolly Shot of crew filming The Alamo by Sean Devine
Sounds
https://freesound.org/people/shelbyshark/sounds/444703/ by Shelbyshark
https://freesound.org/people/AlineAudio/sounds/416838/ by AlineAudio
https://freesound.org/people/primeval_polypod/sounds/156506/ by primeval polypod
"Glass Smash, Bottle, G.wav" by InspectorJ (www.jshaw.co.uk) of Freesound.org