
The first three rules of creating a great video is:
- Great Audio
- Really great audio
- Really really great audio
It has been often said but never said enough: a video that has lack luster visuals and good sound is okay, but not the other way around. If your beautiful Red Epic, 6k 120 FPS video is accompanied by audio that sounds like it was recorded with a paper cup and twine, no one is going to watch it. Good audio is vitally important as it is the one thing, that if done well, is “invisible”. If it is not done well, it is a show stopper.
My experience with sound actually starts as a recording engineer. I worked at a recording studio for a year and ran my own studio for two. That’s where I spent most of my time listening to separate instrument tracks and vocalists. Noise reduction, panning and fading, equalizing and compressing, are some of the necessary tools to create something that is audibly satisfying and not distracting. Most of my audio chops comes from that phase in my career.
It was pretty much an automatic response for me to reach for a quality mic and recording device when I started shooting videos. You don’t need expensive mics or elaborate systems to get the job done. But there are some simple rules I would suggest you follow to get the most out of what you have.
Try to avoid using your cameras built in mic for production audio.
If you can, invest in an external microphone and record from it as opposed to the mic built into your camera. This goes for most DSLR cameras that do not have great internal mics. Your sound will be much better if you invest in something like a RODE VideoMic GO.

The R0DE VideoMic is a great start. It's affordable and much better sounding than your DSLRs built in microphone.
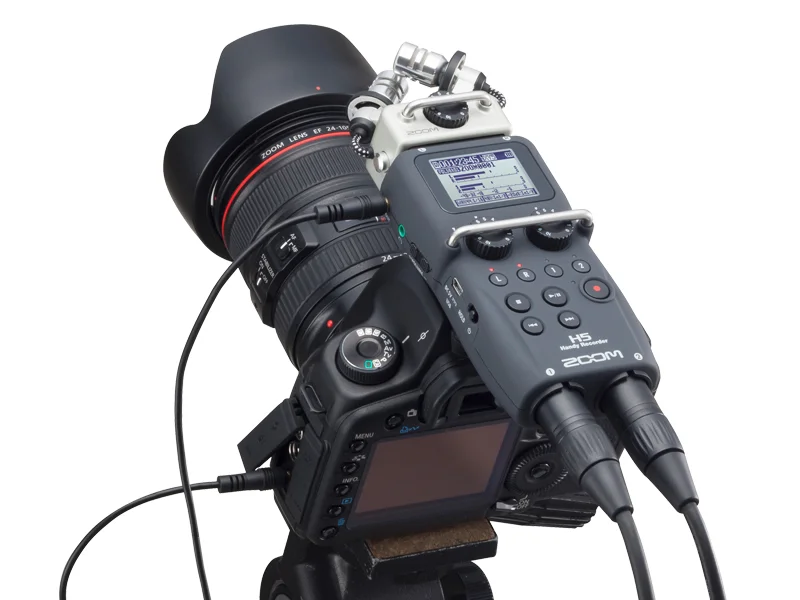
An even better solution is using an external microphone and recorder and sync it to your video in post. At Pixel Valley Studio, we typically use a RODE NTG2 shotgun mic and record into a ZOOM H5 recorder. That way, we can get as close to our talent and eliminate outside noise as much as possible. Then we sync in post and use the internal camera audio only as a reference.
Remove audio reflections in production as much as possible.
If you are shooting in a location with lots of hard surfaces that can reflect sound all over the place, grab a couple of blankets and place them around your talent but not in your scene. This will keep the echo at bay. You’d be surprised how much time a little prevention on set can save you in post.
Get good at using your editor application’s audio tools.
Don’t just drag your audio to the sequence and call it a day. There are many things that you can do to enhance audio in your editor. By simply sticking with the tools provided in your NLE you can work miracles. But you have to know that they are there and how to use them.
I won’t get into too many specifics, but most good editors have basic compression, filters and gain controls to get the most out of your sound. Learn how and when to use them.

This is one of the many tools available in an editor like Adobe Premiere CC.
There are more advanced tools available outside of your editor. For example, we use Adobe’s Creative Cloud suite of applications, so I sometimes jump into Adobe Audition to do some more advanced work. But the audio tools inside of Premiere get the job done most of the time.
Great audio is achievable by everyone
The bottom line is when creating your production, audio should never be an afterthought. If you’re creating high quality videos like we do at PVS or adding a simple video to your YouTube channel, always remember: great audio FTW!